Monday, June 29, 2020

Heffy Doodle: New Release June 2020 Cards

Hello everyone, I am sharing a couple of cards on Heffy Doodle blog using the products from the newest release.

I am sure you all have seen our new release. It’s super cool, right?

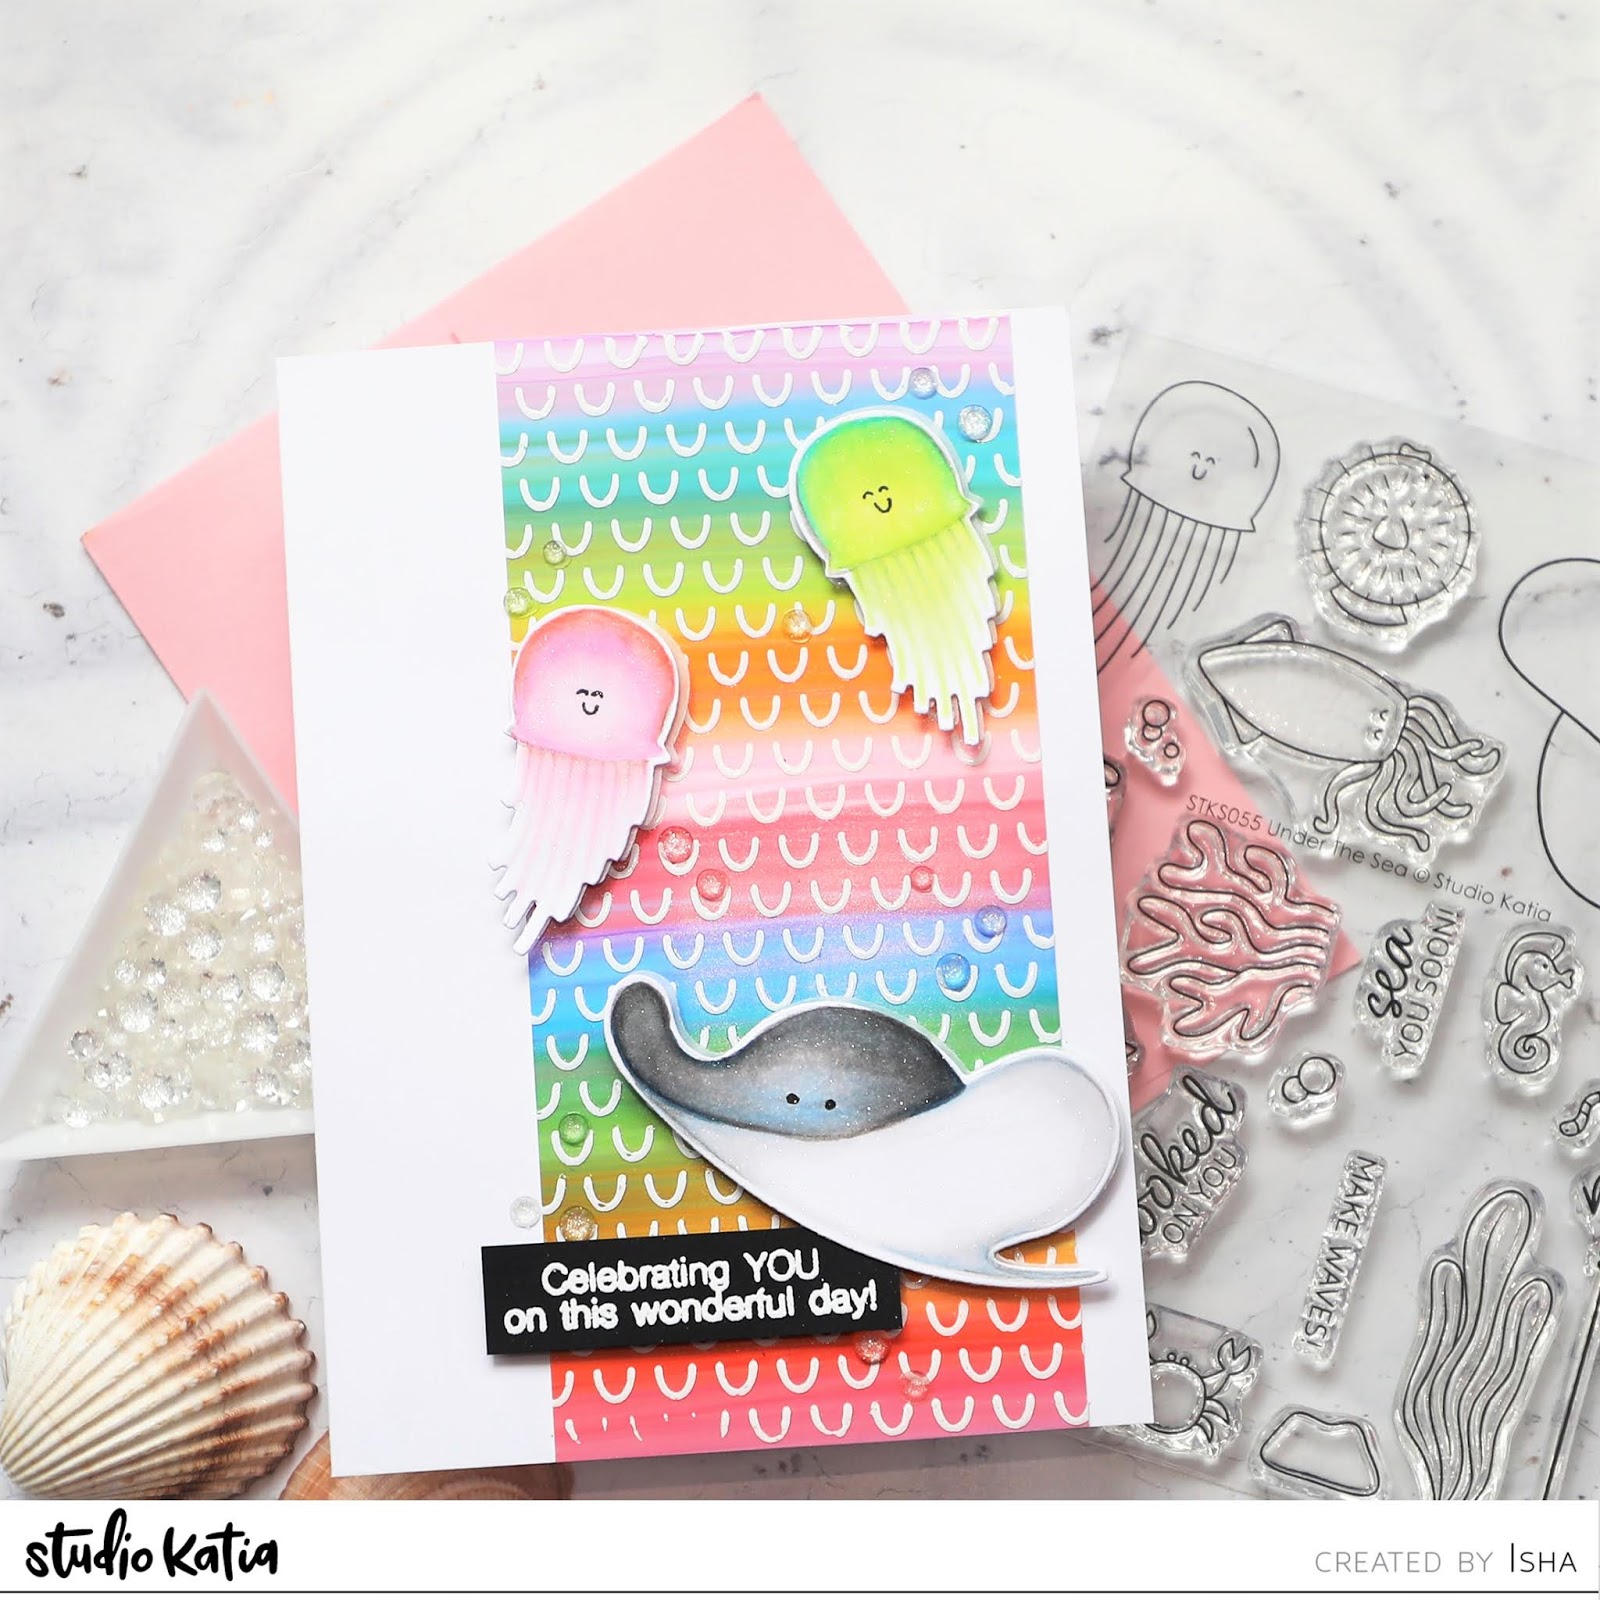
So, let’s start with the first card. I used the A Little Shellfish stamp and dies and the Breaking Waves Border Dies from the new release and mixed these up with the Dino Time stamp and dies, Stitched Slopey Joes Border Dies and Cloudy Skies stencil. I am so happy that everything goes so well together.


I started with a white top fold cardbase using white cardstock. Sponge tumbled glass distress ink through the clouds stencil on the top half part.

Die-cut the wave and the slopes using white cardstock. I sponged blueprint sketch, mermaid lagoon and peacock feathers to the wave. Flick some water and let dry.


For the sand, I sponged tea dye and vintage photo, scattered straw distress ink to the slopes pieces, flick some vintage photo ink and let dry.

Stamp the images using memento tuxedo black ink and color them using copic markers. I then stamped the palm trees using some Altenew inks.

Apply Spectrum Noir sparkle pen to the star fishes, pin wheel and the door knob for some subtle sparkle. Die-cut using the coordinating dies.


Stamp the sentiment and assemble everything together.

My 2nd. card is clean and simple almost one layer. For this card I used Lil Lighthouse stamp and dies, You Go, Gull! stamp and dies, Breaking Waves Border dies from the new release and combined it with the Otterside stamp and dies, Circle Masquerade stencil from the older releases.


Now the Lil Lighthouse stamp and dies are not yet released…no worries Lesley has a wonderful offer: you will get the Lil Lighthouse stamp for free on all pre-orders placed between 24th. June -3rd. July and if the order amount exceeds above £45, you get the dies free too…YAY!!

I made a cardbase using Oreo Crunch cardstock. Take a white mat layer and mask it using the circle mask. Die-cut a post-it using the Wavy border die to use as a mask and sponge tumbled glass and salty ocean distress inks to create the waves. Use the negative side of the mask and sponge squeezed lemonade, abandoned coral and ink to create the sky.


Stamp the images, color using copic markers and adhere to the card using 3D foam. Stamp the sentiment and to finish, add some glossy accent to the lights.

We would love to see your creations using Heffy Doodle products so do tag us whenever you share them. Have a wonderful day!

Supplies:


Thursday, June 25, 2020

Studio Katia June 2020 Release Blog Hop

Hello everyone and welcome to our June 2020 Blog Hop. I am so excited to share the GORGEOUS products Katia has come up with at Studio Katia .


This release includes 6 New Clear Stamp Sets and 4 Sets of Coordinating Dies, 6 New Stand Alone Creative Dies, 15 New Embellishments and a Studio Katia FIRST 6X6 Paper Set!
You should have arrived here from Tracey McNeely's blog. If not start at Studio Katia Blog.

 I have two cards for you today. So without taking much time, let's start.
Card 1
For my first card, I used the Slimline Set 2 dies along with the Mini Birthday Cake stamp and die, Vanilla Luster Fusion sequins. I also used the It's Your Birthday stamp and the Scattered Hearts stencils from the older release.

I started by applying spun sugar, picked raspberry, scattered straw and wild honey distress oxide inks to a panel of white cardstock using Studio Katia blender brushes. I then put the stencil on top and applied the darker shades of the inks lightly through the stencil.
Flick some perfect pearls mixed with water and let dry. Die-cut the panel using the dies. Stamp and emboss the panel. Adhere the center cut panel to the cardbase. Adhere the frame piece to the cardbase using 3D foam.


Stamp the cake image using alcohol friendly ink and color using copic markers. Apply spectrum noir clear sparkle pen to the candles and the icing. Apply glossy accents onto the candles. Let dry.
Adhere everything to the card and apply some sequins.
Card 2
For my 2nd. card I used the GORGEOUS new pattern paper but added a twist. I also used the Flourishing Note stamp and die.

  
I love the pattern a lot but didn't want a bold black print behind the soft image. So, I applied some WOW! Embossing powder rose gold foil to it and ran it through the laminator. Love the result and it's perfect for the background I wanted. I then applied a bit of picked raspberry and squeezed lemonade distress ink to the foiled paper. Die-cut this piece using the Dotted Pattern Set 3
I took a pink cardbase and applied thin gesso to the edges. I then die-cut the Fancy Circle and applied gesso to the frame die.


Stamp and emboss the Flourishing Note stamp twice using WOW! Embossing Powder Copper ep, onto watercolor paper and color using zig clean color markers. On the 2nd image I colored only the flowers and adhere them onto the first image using 3D foam.
Adhere this to the panel and adhere the panel to the cardbase.
To finish, I added some Pink Carnation Crystals and Moss Green Pearls.

Blog Hop Giveaway...YAY!!!Studio Katia is giving away a $50 Gift Certificate on their Blog.
All comments must be left by Friday, July 3rd, 2020, 23:59 PM EST.
All winners will be announced on Sunday, July 5th, 2020 on Studio Katia Blog.

I also have a Personal Blog Giveaway for my followers.
You can win one Gift Certificate of $25 CAD. All you have to do is comment here on my blog. If you like my work, I would love if you visit me on instagram (ishagupta_ig), where I share many more creations.
The winner will be picked and we will post all the winners on
Studio Katia Blog.
Here is the full supply list for you :)


Thursday, June 18, 2020

Studio Katia: Wonderful Day Card

Hello everyone! I am on Studio Katia blog today with a summer theme card. I have created an alcohol pearl ink background and then added some foiling accent using one of the stencils. I am waiting for summer to come hence I used the sweet images from "Under the Sea" stamp set, which I colored in using the no-line copic coloring technique. 


I started by creating my technique layer, for which I added alcohol pearl inks to yupo paper. I actually swiped the colors across the paper and let it dry. The colors I used are (Villainous, Deception, Sublime, Enchanted, Splendor, Sail Boat Blue). Now, I added some of the Deco transfer gel through the Mini Arcs stencil and let it dry for a few hours or until the gel turns transparent and tacky. I then used Snowy White Fab foil by WOW! Embossing Powder, put on top of the stenciled area (mat side down) and ran it through my laminator. Remove the foil and we get this beautiful 3dimensional texture with the subtle pearl effect from the alcohol pearl layer. 


Stamp the images using a very light grey ink onto a copic friendly paper. Draw the eyes using copic multi-liner pen. Color in the images and die-cut them using the coordinating dies. Adhere to the layer using 3D foam tape and apply clear shimmer pen from Nuvo.

Stamp and emboss the sentiment. Adhere the panel to a white cardbase. Adhere the sentiment stripe. To finish, add some Icy Sparkle Crystals (one of my favourites). Thank you for dropping by! Have a nice crafty day!

Tuesday, June 16, 2020

WOW! Embossing Powder . Happy Birthday Card

Hello Everyone! I am on the WOW! Blog today with this monochromatic card using our monthly theme "Repeat Patterns". I like this theme as "repetition" is very important aspect in design. It helps establish visual harmony and also gain notice in a project.

I also used the new and absolutely GORGEOUS WOW! CHANGERS on my card. As the name suggests, these powders change the look of the embossing powders you mix them with. They come in Sheen - a pearly soft shimmer, Glisten - a beautiful mix of glitters and Texture add a beautiful texture to the embossed image. For my card I mixed the Glisten and Texture CHANGERS with the Rose Glintz embossing powder.

I created a monochromatic card with a pop of color. I used the Camouflage Die-cutting technique for this one.


I started by creating a white cardbase. Then I created my embossing powder mixture. I used Metalline Dark Blue powder 3 parts along with the CHANGERS (Sheen 2 part and Texture 1 part). I then took a white cardstock and applied WOW! slow drying ink to the full panel. Sprinkle the mix and heat emboss it using the WOW! Dual heat tool. This really gives a beautiful pearly shine and texture like a fine sandpaper to the panel. I cut a quarter of an inch wide stripes out of this. Take a royal blue panel and adhere the stripes to it.

Die-cut the heart using the Stitched Heart Dies by Heffy Doodle. Die-cut the heart 3 more times using white cardstock and stack them together.


Adhere the blue panel to the cardbase. Adhere the heart in the open space.

Die-cut the word birthday and adhere to the card. Stamp the flower and the leaf using Heffy Doodle Blooming Marvellous stamp and die-cut them.


Adhere to the card. Finish by stamping the word Happy and adhering it.

We would love to see your creations onto our facebook page.

Stay safe and have a nice crafty day :)

Sunday, June 7, 2020

Studio Katia - You're So Sweet Card

Hello everyone! Sharing a floral card on Studio Katia blog. I enhanced the soft image with a rainbow alcohol pearl background. 


I started by creating a panel using Tim Holtz alcohol pearl inks. I simply took the colors (Villainous, Deception, Sublime, Enchanted, Splendor, Sail Boat Blue) in rainbow order and applied the ink to a yupo paper in swiping motion and then dabbing movement. Once I was happy with the result, I let this dry. Make a salmon pink cardbase. Die-cut a white cardstock layer using the Loops cover die. Adhere the alcohol pearl panel behind it. Stamp the sweet pea from the You’re So Sweet stamp, add a touch of color using zig clean color marker and die-cut it. 


Die-cut the banner using the die from Best Ever die-set. I cut it once in white and once in the cardbase color. Stamp sentiment. Adhere the pink layer to the white by slightly offsetting it. Adhere the images and the banner. To finish, I applied a bit of spectrum noir clear sparkle pen to the florals. Thank you for dropping by! Have a nice crafty day!

Thursday, June 4, 2020

WOW! Embossing Powder - Congrats Card

Hello Everyone! I am on the WOW! Embossing Blog today. We have a new challenge on our facebook group and the theme is "Repeat Patterns". I like this theme as "repetition" is very important aspect in design. It helps establish visual harmony and also gain notice in a project.

I also used the new and absolutely GORGEOUS WOW! CHANGERS on my card. As the name suggests, these powders change the look of the embossing powders you mix them with. They come in Sheen - a pearly soft shimmer, Glisten - a beautiful mix of glitters and Texture add a beautiful texture to the embossed image. For my card I mixed the Glisten and Texture CHANGERS with the Rose Glintz embossing powder.


To start, I took a white panel and stamped the Brushed Stroke Stripes by Studio Katia using the Altenew Pink Pearl ink. I then took the narrower stamp, stamped it using WOW! slow drying ink and embossed it using the mix I created using the CHANGERS. For the mix, I used 2 parts Rose Glintz, 1 part each of Glisten and Texture. Mix the powders well and use a metal spoon to scoop the powders.

Now, I adhered this piece to the cardbase. Die-cut the Skinny Metric Rectangle frame by Heffy Doodle and adhere it to the card.

Stamp the Frosted Garden stamp by Altenew using the slow drying ink onto vellum, emboss using Opaque White powder, die-cut and adhere to the card.

Stamp the sentiment and adhere to finish the card. Love all the glittery texture.

We would love to see your creations onto our facebook page.

Stay safe and have a nice crafty day :)