Sunday, November 29, 2015

Winnie & Walter Leading Lady Part 4

Hello everyone! I am back again with the part 4 of my leading lady post. As they say time just flies by when we are having a good time :) It's exactly how I felt while creating for these posts. I want to thank Julie and Shay once again for having me here on the blog.
Today is my last post and even-though I feel sad, I am happy as these awesome products really helped me stretch my creativity. I hope you enjoyed as much as I did creating.


Now to today's post. I had a hard time thinking about the theme as there are still so many ideas floating around...lol. First I thought about quick and simple CAS cards but then I looked at the AWESOME stencils and decided to keep my theme around them. I tried to do various techniques on each card. Some of the photos are not as great cos we are having very dull weather these days.

Let's start with this first card. As we all know doodling and Zen-tangle is a hot trend at the moment. I used the stencil to create Zen-tangle pattern. Love how wonderful this stencil is. Then I die-cut the big bold Joy word and stacked it using pink cardstock. I applied glossy accent over the word"JOY". I used Imagine Crafts Memento inks for this card.


Card 2 was so much fun to create :) I used ImagineCrafts Fireworks sprays, Copics, Gesso for this card.


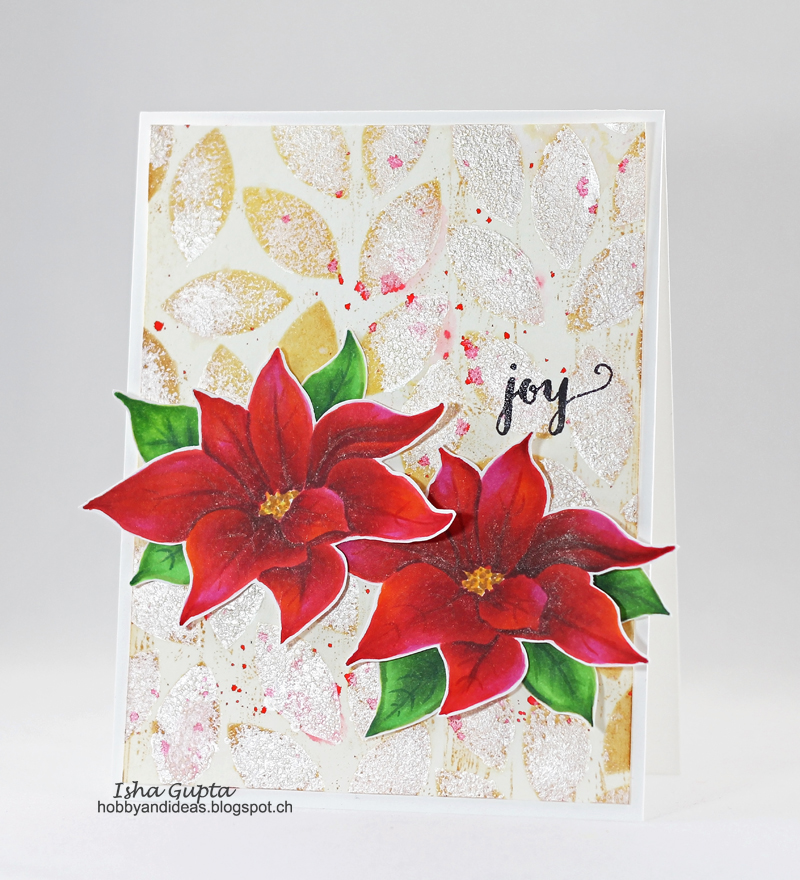
Card 3 was the most difficult to photograph as I used the iridescent creative medium and all the fine shimmer was difficult to capture. I used ImagineCrafts Iridescent Creative medium to create the background.


For my last card I used no-line coloring using Copic markers. For the background I used various Memento dye inks and pearl white acrylic paint.


I have more information and photos on Winnie&Walter blog HERE

Now another fun thing: Julie and Shay have generously given me a 30$ Gift Card for their store. By commenting on all my Leading Lady blog posts every Saturday this month (there will be four posts in total), you will get a chance to win. If you missed my first post, you can check it out HERE, my 2nd. post HERE and the 3rd. post HERE. I will draw a winner next Saturday!! Please check then and don't forget to comment on all the 4 Saturdays on my leading lady post to be eligible to win :)


Thank you for dropping by! 

Friday, November 27, 2015

Time To Shine/ Fun Stampers Journey Jewelry

Hello everyone! Today, I am sharing something awesome and different. It's a jewelry piece and FUN!!!
Richard Garay offers a beautiful line of jewelry "Time to Shine Journey Girl Jewelry" and the fun part is, you can customize the pretty pendents from this collection.
This would make pretty gifts too, I know my elder daughter grabbed mine as soon as she saw it...lol

This is how I decorated mine


I decided to use the dies from Spellbinder's Celebrations Line by Richard Garay. Now the die is much bigger, so here is how I created it:


1. Die-cut a piece of clear shrink foil using the word "Love" from the "All You" die set and dab some FSJ Rich Coral ink  onto the back.
2. Shrink the foil using heat gun. Check out how small it gets in photo no. 2
3. Now, I created my own background using Silks. I spritzt water generously onto watercolor cardstock and applied "Cool Caribbean" and "Lucious Lime" Silks. Once dry, I added some flick to the paper. 
4. Then I die-cut a circle to fit to the size of my pendent base.

Here is how you can assemble (Photo 4)

1. Open the pendent base and insert one of the clear circles into the bottom ring.
2. Place the diy watercolored circle and the word Love onto it.
3. Insert the clear ring on top and then finally cover it with the 2nd. clear circle and close the pendent.
Adhere the pendant to the chain...total fun :)
There are tons of possibilities to decorate the pendents along with the charms available.

Thanks for stopping by!

Wednesday, November 25, 2015

Thank You!

Hello Everyone! Today, is Wednesday and that means a new challenge over at at Simon Says Wednesday Challenge blog. Today is my last post with them this month :( Hope there will be more sometime :) I want to say "Thank You" to SSS and Lorraine for having me at the blog and the DTs for all the encouraging and sweet comments. I really enjoyed my part as a guest designer :) 

wed-designerspotlight-header

wed-newchallenge-header

This week's theme for the challenge is: ANYTHING GOES and we are sharing Altenew products this week.

Simon Says Stamp Wednesday Challenge Blog

Here is my Thank You card :) I used Emboss Resist technique and my inks by IMAGINECrafts.


I used Altenew Vintage Flowers and Label Love stamp set
Simon Says Stamp will be giving away $50 voucher to shop at the fabulous Simon Says Stamp Store

50dollar_voucher_600px

Simon Says Stamp

Hope to see you play and don't forget to check out awesome creations by the DT's at the Simon Says Wednesday Challenge Blog

Along with the supplies below, I also used Kaleidacolor ink Desert Heat by IMAGINECrafts!


Monday, November 23, 2015

Merry Christmas

Hello Everyone!
It's Monday and that calls for more inspiration on the Waffle Flower Challenge Blog. This month we challenge you to use "Masking Technique" in your creations. There are so many ways to use this technique....looking forward to see your creations. We have some Gorgeous creations by some of the talented ladies and we still have time so, hope you will join us.


For my card, I used 2 ways to mask. I used "Stocking and Willy and Friends"stamp sets. I masked the tiny garland dots using liquid mask and I masked the gifts and stocking using post-it note. Masking is fun and I enjoy it a lot too. So for my card I stamped and embossed the sentiment first, then stamped the garland. I then masked the tiny dots. Once the masking fluid was dry I stamped the fir leaves using Kaleidacolor ink..
Then I stamped the stoking, masked it using post-it. Stamped the blue gift, used mask, stamped the 2nd. gift. I colored in my images using Copic markers.


 We also have a photo and sketch to inspire you further. The hanging leaves were the inspiration of my hanging sentiment :)


I used  stamp set for my card. I used the colors from the inspiration photo below:


Challenge ends on the 25th of each month. You can link up your creations and will find all the information along with the prize details HERE.

Supplies:

Saturday, November 21, 2015

Winnie and Walter Leading Lady Part 3

Hello Everyone!! I am back with the Week 3 of my Leading Lady Post:) I am enjoying the products so much and these are so versatile that I am motivated to try new things :)


So, today's post is all about Home Decor. I made a simple hoop, a banner out of my patterned paper scraps (perfect way to use those tiny bit) and then I tried a silk painting all by myself. I am so glad to do that and now need some practice to get better....see you don't only have to make cards or papercraft projects with these AWESOME supplies...lol
Check out the Winnie&Walter supplies I used for my creations and more photos HERE

First the Hoop, I did some stamping and paper piecing :) I had this beautiful fabric, which I was hoarding as this was a gift by my friend Agata and I loved this :) I used Copics to color the birds, ImagineCrafts Kaleidacolor inks and Fabriano markers.


For my 2nd. project I tried some silk painting. I used Imagine Crafts All purpose inks for this project.


Now for my last project I am back to my Holiday decor and made a banner. The most Awesome thing is, that the digital cut files which comes with the stamps made it so easy to cut all those pieces using my Cameo. After I had all my pieces ready it was so quick :) I could also use so many of my scraps of patterned papers to cut various tags :) I used Kaleidacolor inks, Delicata Gold ink and VersaFine Onyx Black ink.


I hope you enjoyed and got inspired by today's projects. 

Now another fun thing: Julie and Shay have generously given me a 30$ Gift Card for their store. By commenting on all my Leading Lady blog posts every Saturday this month (there will be four posts in total), you will get a chance to win. If you missed my first post, you can check it out HERE and my 2nd. post HERE.


Have a nice weekend!

Friday, November 20, 2015

Keep it Simple: Make Amazing Design Team

Hello everyone!
Today I am sharing a project using the Spellbinder's Celebrations Line by Richard Garay. This time the theme is "Technique Video". I am sharing a couple of techniques "direct to paper inking, Emboss resist and iron-off" and have kept my card simple. It's been a long time since I did my last video, so do bear with me....lol 


Here is my video for you :)


Some of the supplies I used


Hope you enjoyed watching :) Happy weekend!!

Supplies:
 Cardstock: Stamp: Doily Fun, My Friend; Ink: Cool Caribbean, Pixie Play, Cotton Candy, Captivating Coral; Die: Pierced Square
Cardstock: Whip Cream, Black Licorice; Ink: Black Licorice, Denim Days; Journey Foam Squares; Journey Tape Runner, Journey Bloom Tool

Others: ImagineCrafts featuring Tsukineko: VersaMark ink; WOW! Embossing Powder (Clear, White); Uniball Signo White Gel Pen.

Wednesday, November 18, 2015

Hope Santa Spoils You!!

Hello Everyone! Today, is Wednesday and that means a new challenge over at at Simon Says Wednesday Challenge blog. Since I am guest designing with them this month, I have a card for you :)

wed-designerspotlight-header

I will be sharing my creations with you every week in the month of November :)

wed-newchallenge-header

This week's theme for the challenge is: CHRISTMAS and we are showcasing My Favorite Things Products!

Simon Says Stamp Wednesday Challenge Blog

Here is what I created:


I used MFT Stamp and patterned paper to create my card. I also used some ImagineCRAFTS "featuring"Tsukineko products.

Simon Says Stamp will be giving away $50 voucher to shop at the fabulous Simon Says Stamp Store

50dollar_voucher_600px

Simon Says Stamp

Hope to see you play and don't forget to check out awesome creations by the DT's at the Simon Says Wednesday Challenge Blog

Copic Markers: W7, W5, W3, W1; RV25, RV23, RV21; YG17, YG03, YG01; Y38, Y35, Y15; E13, E11, E00, E000