Monday, March 30, 2020

WOW! Embossing Powder & Whimsy Stamps Collaboration Blog Hop

Hello and welcome to the WOW! Embossing Powder and Whimsy Stamps collaboration blog hop. It was so much fun combining the products from both the companies. 


You should have come here from Lori U’ren's blog. If not start at the WOW! Embossing Powder blog.
  I have two cards for you today :)

Card 1 - I started by using the  leaves from the Layered Peruvian Lily to create the background. I stamped the leaves in WOW! slow drying ink and embossed using the Montserrat, Dominica embossing powders. I then tore a vellum stripe to ground the word SMILE. For that I used the Smile Word Die, applied the slow drying ink and embossed it using Black Magic embossing powder. I repeated the process 2 more times so that we get some dimension to the word. Adhere the word to the stripe. Mat this layer with black cardstock and adhere to a white cardbase.
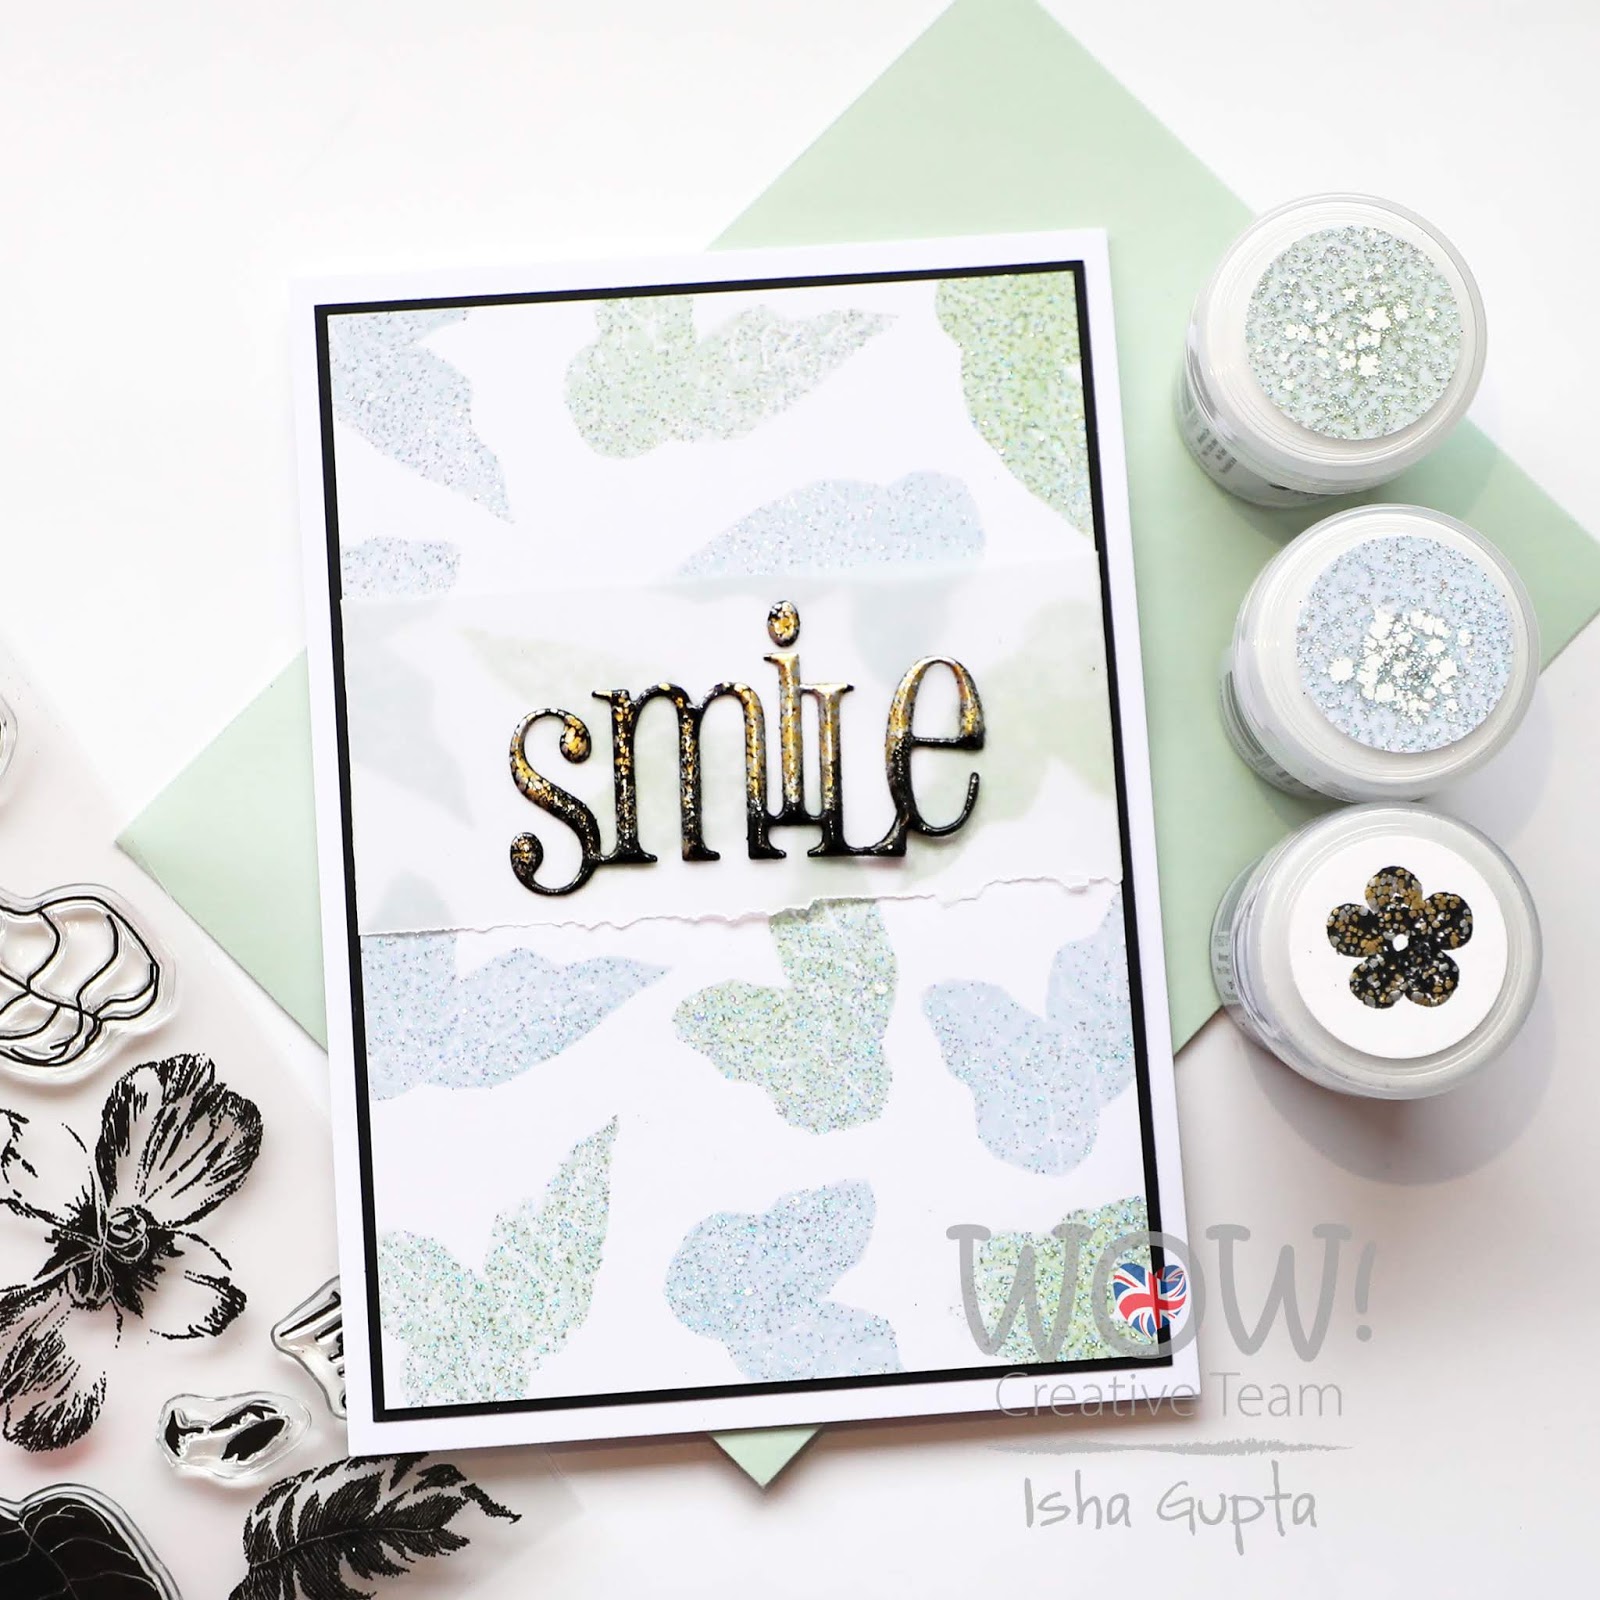

Love the effect :)


For my next card, I created a background wash using green watercolor, let it dry and flick some gold ink to it. I then die-cut the word SMILE and embossed it the same way as my first card. Now, I stamped and embossed the flower and the leaves using  Black Glint and Lime Rickey embossing powders. 
I then die-cut 2 circle frames using circle dies and adhere it to the card and embossed one of the circle using Pink Sherbert embossing powder. I then applied a light wash of pink color to the flower and created the cluster. Assemble the card.

Love the glitter of the Lime Rickey embossing powder.


Gorgeous Flower and the word SMILE.


Your next stop on the hop is
Iris Wiechmann's blog.
 
There are two prizes which means two winners!!!! YAY!!!
WOW! Embossing Powders has 6 powders of your choosing along with a WOW carry case to store your powders safely in.
Whimsy Stamps is giving away a $25 gift certificate to their store.
To join this GIVEAWAY you must leave a comment on the designer's blog post and each comment you leave is an entry for a chance at getting your hands on these prizes.
This hop is open internationally.
The Winners will be chosen at random in the week of the of 8th of April from the comments left on THE POSTS.
 
 Enjoy the hop and have a nice day!

Thursday, March 26, 2020

Studio Katia: Rainbow Hello Card

 Hello everyone! 
 I am on Studio Katia blog with a rainbow stenciled card. Hope you all are staying safe. I wanted to create a fun, cheerful card and rainbows I feel are full of hope and brightens any gloomy day. I used the Ink Splash stencil and added more interest by overlapping parts of it.


I started by making a white top fold cardbase. I die-cut the Half Striped Cover die and label from Dotted Patterns Set 4 from white cardstock.

Using the blender brushes, I applied distress oxide inks in spun sugar, squeezed lemonade, wild honey, peacock feathers, wilted violet, worn lipstick and twisted citron through the stencil onto the cardbase. I used the big splat part first. Now I applied the similar colors of ink through the small splatters over the first layer.

I then flicked some water. once dry, I flicked some gold watercolor to it.


I then die-cut the word HELLO, applied embossing ink and embossed it using WOW! Pearl Gold Sparkle embossing powder. Repeat the process two more times. Stamp the sentiment onto the label.

Adhere the half striped cover die-cut and the sentiment label to the card. Adhere the word. To finish apply a few gold sparkle Crystals.

Thank you for dropping by!

Have a nice crafty day!

Saturday, March 21, 2020

WOW! Embossing Powder - Happy Birthday Card

Hello Everyone! The March challenge is here on our facebook group and the theme is "New to You Products". Don't forget to play along, we would love to see your creations :)
 
I decided to use the new Trios by Seth Apter "METALZ". It's a beautiful mix of metallic, glitter, ultra high embossing powders. I couldn't decide on one so created this multi-colored embossed background for a fun look. I also used new to me Lime Rickey embossing powder by Catherine Pooler.


I took a pink cardbase. I then made a mat layer using WOW! Superior Smooth white cardstock. I applied WOW! Clear Ultra Slow drying ink to the Walk in the Woods stamp by Altenew and added Crusty Copper, Weathered Gold and Etched Platinum embossing powders to it to create this multi colored embossed look. Now heat set the powders using the WOW! Dual Heat tool.

I added some pink and yellow color using mustard seed and picked raspberry distress ink using the smooshing technique. The embossed parts will resist the ink.


I die-cut some flowers and applied color using copic markers. I die-cut the leaves using white cardstock, applied clear ink and embossed using Lime Rickey embossing powder.

Die-cut a circle frame and adhere vellum behind it to ground the floral cluster. Adhere the flowers and the leaves.

Now, die-cut the word "Happy" using Heffy Doodle word die. Apply clear ink to it and heat emboss using crusty copper embossing powder. Repeat the same step 2 more times to get a nice dimensional effect.

Adhere it to the card and the sentiment stripe.

To finish, I adhered some dark sparkle crystals by Studio Katia.
 
Have a nice day!


Thursday, March 12, 2020

Heffy Friends Blog Hop!

Hello everyone and welcome to the Heffy Friends Blog Hop! Today we are celebrating the new Heffy Doodle release with some great inspiration and a giveaway, too!


This is a super fun release with lots of GORGEOUS products for a variety of styles. I have 5 cards for you today, so without further ado....let's start :)

For my 1st card, I used the adorable Otter side stamps and dies along with the Scalloped Square Masquerade, Wave to Me and Stormy Seas stencils.


I started by first putting the scallop square stencil onto my mat layer, then I put the wave stencil on top and sponged distress inks to it. I then stamped, colored and die-cut the images. The cute otter has a cut in the die to tuck in the little heart. How clever right?


I then assembled everything together and applied some clear sparkle pen to the heart and the wave.

For my 2nd. card, I used this adorable Otter stamp and dies along with the Stormy Seas stencil, Stitched Slopey Joes Border dies, Swirly Clouds dies, Sun Moon and Stars dies.

I sponged some distress inks to create my background. I then stamped, colored and die-cut the images. I cut the sun and colored it using copic markers. For the sand, I cut the slopey Joes Border and applied WOW! Sparkling Sand embossing powder to it. I also applied some of the same embossing powder to the rock image. Now, I die-cut the clouds


and assemble everything together. To finish add a bit of sparkle onto the heart and the sun :)

For the 3rd. card, I created the background panel by sponging some distress oxide and inks to the panel, then I run it through the die-cutting machine using the Stitched Heart Background die. I then die-cut the panel using the Stitched Heart die.

Stamp, color and die-cut the image. Die-cut the I Love You words, emboss using embossing powder. Die-cut a few leaves from the Amazonian Leaves dies and color them.


To assemble the card, first adhere the heart to the cardbase. Now apply 3d foam to the negative part of the layer and adhere it to the card. Adhere the rest of the images and die-cuts.


Cute! Right?

For my next card, I used the GORGEOUS Wonderfully Woven stencil and let the background shine. I then stamped and embossed various sentiments from the More Classic Sentiments set onto black card. I sponged some distress inks to the card layer. I then applied some DIY embossing glitter paste to it through the stencil. To make the embossing paste, I took some translucent embossing paste and mixed some clear glitter to it. Remove stencil and let this piece dry.


Love the subtle sparkle.


Assemble everything together.

For my last card, I used the pretty Quilted Heart Background Die to create the background. I then die-cut this delicate frame from silver cardstock using Skinny Circle Frame dies. I then adhered vellum behind the frame to create a muted base for the sentiment focal image. I die-cut the shadow of the sentiment using white cardstock and the word using pink cardstock.


Apply clear sparkle pen to the words.


Assemble everything together. You can check out all the HEFFY Doodle products HERE in the shop.

PRIZES AND GIVEAWAY

To celebrate the new release Heffy Doodle will be giving away a £50 voucher to the Heffy Doodle Store! Make sure to comment on each stop in the hop to be entered for your chance to win. The winner will be selected randomly and announced on the Heffy Doodle blog on March 19th!

Here is the full hop order:

Heffy Doodle Blog

Thanks for dropping by! Have a nice day!